Showing posts with label Recipe. Show all posts

Wednesday, October 15, 2025

Recipe Rabbit Hole

I almost forgot to write a post this morning. As I was making my coffee, I was thinking that I haven’t cooked any fish in a while and how much I’d like some rainbow trout. This recipe for baked rainbow trout is one I’ve made many times, and it always turns out delicious.

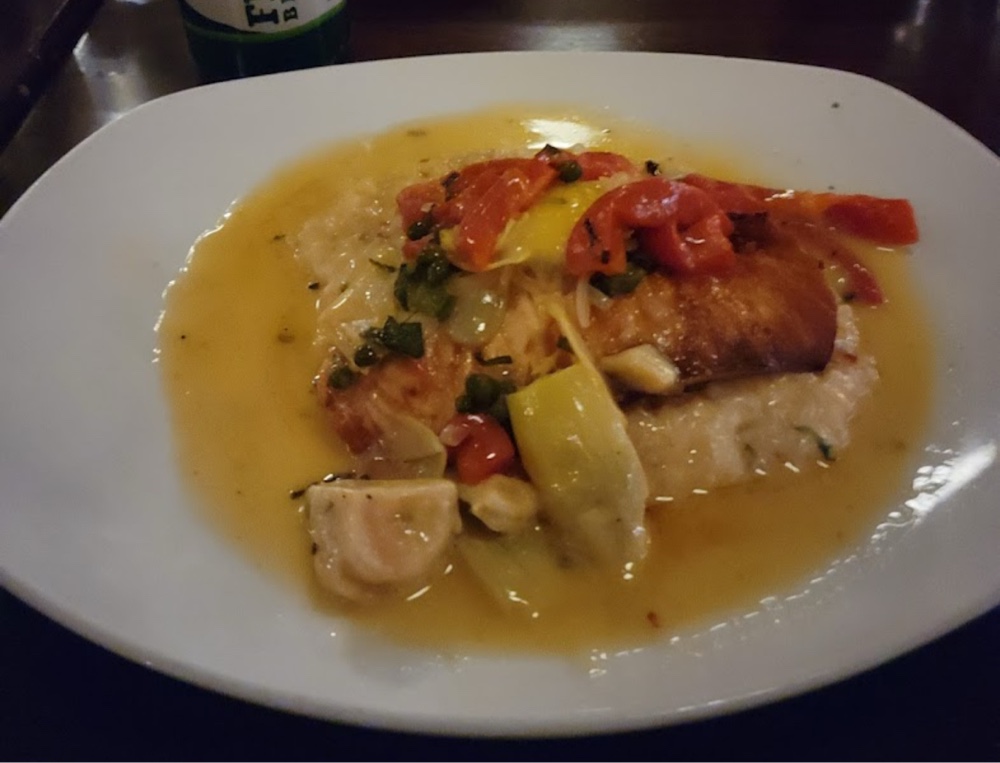
That little thought sent me down a rabbit hole that started with a recipe for balsamic glazed salmon. From there, I started thinking about one of my favorite dishes at a local Italian restaurant, Sarducci’s in Montpelier: Salmone Cucina — wood-roasted salmon with artichokes, red peppers, lemon, and capers in a white wine sauce, served with risotto. Because I’d love to recreate it at home, I asked ChatGPT to create a recipe based on the menu description. Here’s the result:

🐟 Home-Style Salmone Cucina Recipe

Ingredients (serves 2–4)

For the Salmon & Sauce:

  • 4 salmon fillets (6 oz each, skin-on or skinless)
  • Salt and freshly ground black pepper
  • 1–2 Tbsp extra-virgin olive oil
  • 1 small shallot, minced (or half a small onion)
  • 2 cloves garlic, minced
  • ⅓ to ½ cup dry white wine (or substitute, see note below)
  • Juice of ½ lemon (plus lemon slices for garnish)
  • 1 Tbsp capers, drained
  • 1 small roasted red pepper (jarred or freshly roasted), sliced
  • ½ cup artichoke hearts (marinated or canned, drained and quartered)
  • Fresh herbs (parsley or thyme work nicely)
  • 1 Tbsp butter (optional, to finish the sauce)

For the Risotto:

  • 1 cup Arborio rice
  • 1 Tbsp olive oil + 1 Tbsp butter (or all olive oil)
  • 1 small shallot or onion, finely chopped
  • 4 cups chicken or vegetable stock, kept warm
  • ½ cup dry white wine (or substitute, see note below)
  • Salt and pepper to taste
  • ½ cup (or more) freshly grated Parmesan cheese
  • Optional: a splash of heavy cream or extra butter for added creaminess

Alcohol-free substitute:

If you avoid alcohol (even in cooking), you can replace the wine with a mixture of ¼ cup white grape juice + ¼ cup low-sodium broth + 1 teaspoon white wine vinegar or lemon juice for every ½ cup of wine.

Directions

1. Prepare the Risotto

  1. Warm the stock in a saucepan over low heat.
  2. In a separate large skillet or pot, heat olive oil and butter over medium heat. Add chopped shallot or onion and sautΓ© until translucent (2–3 minutes).
  3. Add Arborio rice and stir to coat; cook 1 minute.
  4. Pour in the wine (or substitute); stir until almost evaporated.
  5. Begin adding warm stock, one ladle at a time, stirring often and letting the rice absorb each addition before adding more. Continue until the rice is creamy and tender, about 18–20 minutes.
  6. When nearly done, stir in Parmesan cheese, adjust seasoning, and add a bit of cream or butter for richness, if desired.

2. Cook the Salmon & Sauce

  1. Preheat the oven to 425°F.
  2. Pat salmon fillets dry and season lightly with salt and pepper.
  3. In an ovenproof skillet, heat olive oil over medium-high heat. Sear salmon for 1–2 minutes per side, just until lightly browned. Transfer the salmon to a plate.
  4. In the same skillet, sautΓ© shallot and garlic until fragrant (about 1 minute).
  5. Add wine (or substitute), lemon juice, and zest; simmer 2–3 minutes.
  6. Stir in capers, red pepper, and artichokes; cook briefly until heated through and the sauce thickens slightly.
  7. Return the salmon to the skillet, spoon sauce over the fillets, and transfer to the oven. Roast 5–8 minutes, or until the salmon flakes easily with a for

3. Serve

Plate a generous scoop of risotto, top with salmon, and spoon over the sauce with artichokes, red peppers, and capers. Garnish with fresh herbs and a squeeze of lemon

Notes & Tips

  • For the roasted red pepper, you can use jarred to save time, or roast your own under the broiler until charred, then peel and slice.
  • Rinse capers briefly if they’re very salty.
  • If your sauce tastes too sharp, add a small pat of butter or pinch of sugar to mellow it out.
  • A drizzle of olive oil over the finished plate adds richness and shine.

If you can’t make it to Sarducci’s, this version brings the same rustic Italian warmth to your own kitchen. I think I may have to pick up some salmon this weekend and give it a try myself.


Have a delicious Wednesday, everyone. Now I’m craving Italian food for dinner.

Wednesday, December 4, 2024

National Cookie Day


Today’s is December 4th, National Cookie Day. Growing up, I remember my mother baking cookies throughout the month of December for different holiday parties and get togethers. When I was in elementary school and we still had a Christmas party, everyone would bring some kind of treat. Our fellow students would only allow me and my sister to bring one thing: Mama’s cookies. They were basic cookie recipe from the Betty Crocker Cookbook with icing on them. I never thought there was much special about them, but everyone else seemed to love them. I much preferred my mother’s pecan cookies or her snowball cookies, which were my favorite. (See recipe below.)

We can thank the Dutch for more than windmills and tulips. The English word "cookie" derives from the Dutch word koekie, meaning "little cake." Hard cookie-like wafers have existed for as long as baking has been documented. Not surprisingly, they traveled well, too. However, they were usually not sweet enough to be considered cookies by modern-day standards. The origin of the cookie appears to begin in Persia in the 7th century, soon after the use of sugar became common in the region. They then spread to Europe through the Muslim conquest of Spain. Cookies were common at all levels of society throughout Europe by the 14th century, from the royal cuisine to the street vendors.

Cookies arrived in America in the 17th century. Macaroons and gingerbread cookies were among the popular early American cookies. In most English-speaking countries outside of North America, the most common word for cookie is "biscuit." In some regions, both terms, cookies, and biscuits are used.

To celebrate National Cookie Day, pick up some cookies at your local bakery and share some of your cookies with your family and friends! A great way to get started is by making a list of your favorite cookies to bake and enjoy. Then organize your baking tools and start your assembly line.

Snowball Cookies

Prep Time: 30 Min
Cook Time: 15 min
Servings: 60

Ingredients
• 1 cup unsalted butter, softened
• ½ cup powdered sugar
• 1 teaspoon vanilla extract
• 2 ¼ cups all-purpose flour
• 1 cup very finely chopped pecans
• ¼ teaspoon salt
• ⅓ cup powdered sugar, or more as needed

Preparation Steps
1. Gather all ingredients. Preheat the oven to 350 degrees F (175 degrees C).
2. Beat butter, 1/2 cup powdered sugar, and vanilla with an electric mixer in a large bowl until smooth.
3. Gradually mix in flour, pecans, and salt until completely incorporated.
4. Roll dough into walnut-sized balls and place 2 inches apart onto ungreased baking sheets.
5. Bake in the preheated oven until bottoms are light golden brown but tops are still pale, 12 to 15 minutes. (Try not to let cookies get too brown: it's better to undercook them than to overcook them.)
6. Remove cookies from the oven and let sit on the baking sheets briefly before removing to wire racks.
7. Place 1/3 cup powdered sugar in a shallow bowl; roll hot cookies in sugar to coat, then return to the wire racks to cool.
8. Once cooled, roll cookies in the powdered sugar once more.

Note
Snowball cookies are incredibly easy to make for rich and buttery, melt-in-your-mouth festive treats rolled in powdered sugar to resemble snowballs.

Nutrition
Calories: 63 kcal
Fat: 4 g
Saturated Fat: 2 g
Unsaturated Fat: 0 g
Cholesterol: 8 mg
Sodium: 9 mg
Carbohydrates: 6 g
Fiber: 0 g
Protein: 1 g

Source URL
https://www.allrecipes.com/recipe/11171/snowballs-ii/

Monday, November 18, 2024

Soup Weather

Luckily, I don’t have to work today. I have an appointment up near Burlington at noon, so if I went to work today, I’d have to leave around 11 am and would not be back until before 2 pm. It just wouldn’t be worth it. 

Besides, while I am in the Burlington area, I have a few errands I need to run. One of those errands a is to run by a grocery store. (The other is to have lunch at a Mexican restuarant I enjoy. I had planned yesterday to try a new soup recipe, but I realized it called for three cans of cannellini beans, and I had only gotten one. It’s definitely soup weather, and I love a good soup. The soup is a Creamy White Bean and Kale soup. The soup has two of my favorite things in a soup, beans and kale. I usually only buy kale when I am going to make Zuppa Tuscano, but this recipe looked pretty good, even if it is vegan, although I think the addition of ham, or even Italian sausage, in this soup might be pretty good. I haven’t decided if I will modify the recipe with a little ham or not; I’ll see what my mood is when I’m making the soup. The recipe says it’s for four people, but that sounds like a lot of soup for just me, so I may half or at least third the recipe. Anyway, this soup is what I plan to make for dinner tonight.

I love trying new soups. Sometimes, they are really good and I can’t get enough of them, and sometimes, they fall flat. Do you have a favorite go to receive for when the weather cools down in fall and winter? If so, let me know. I may want to try it.

Thursday, March 7, 2024

Zuppa Toscano (Tuscan Soup)

I know that Olive Garden does not have the best reputation in the restaurant industry, and their food only has a passing relationship with Italian cuisine. The last time I went to an Olive Garden, the food was not only inedible, but nearly everything we ordered was “out of stock.” It was not a pleasant night, because I went with a good friend of mine, and we were going to see the movie Bros afterwards. We only went to Olive Garden out of a sense of nostalgia. At one time, I thought their food was good, but then I went to Italy and have eaten at some great Italian restaurants here in the U.S., and my opinion changed dramatically. 


Anyway, there is one thing on Olive Garden’s menu that is a favorite of mine: their Zuppa Toscano. The “Tuscan Soup” is a sausage, kale, and potato soup, that is delicious when it is made correctly. The salad and breadsticks were always good, but the Zuppa Toscano was always the best thing on the menu. By the way, that last time I had it at Olive Garden, it was watery and tasteless. Luckily, I found a wonderful copycat recipe. Some of the copycat recipes you can find online are a pretty good approximation of the original dish. 


The recipe below is, in my opinion, even better than what Olive Garden serves. Some people don’t like kale, and I will admit that I am not a huge fan, but it has the perfect consistency for this soup. I would not use anything as a substitute because while kale wilts in the soup, it has a better consistency and does not add a bitter taste like some greens would. Even if you don’t like kale, give it a try. I think you will be glad you did.


I don’t make this recipe very often, and usually only in the winter. I tend to eat too much of it when I make it, so it’s best to limit myself. I’m actually planning on having some leftover Zuppa Toscano for lunch today. The link for this copycat recipe in on Delish; however, the recipe is now behind a paywall. Below is the version that I have found to be the best.


Zuppa Toscana


Prep Time: 20 min

Cooking Time: 45 minutes

Servings: 4


Ingredients


• 1 lb. hot Italian sausage, casings removed *

• 1 large onion, chopped

• 3 cloves garlic, minced

• ¼ teaspoon kosher salt

• ¼ teaspoon freshly ground black pepper

• 6 cups low-sodium chicken broth **

• 2-3 cups of russet or red potatoes peeled, sliced, and cut into bite sized pieces ***

• 1 bunch curly kale, leaves stripped and chopped

• 3/4 c. heavy cream

• 4 slices cooked bacon, chopped

• 1/4 freshly grated Parmesan, for serving ****

• French bread or a crusty rustic bread for serving, if desired (it’s delicious for dipping in the soup)


Preparation Steps


1. In a large pot over medium heat, cook sausage, breaking up with the back of a wooden spoon, until browned and no longer pink, 5 to 7 minutes.


2. Transfer to a plate lined with paper towels to drain.


3. Add onion to pot and let cook until soft, 5 minutes, then add garlic and cook until fragrant, about 1 minute more.


4. Season with salt and pepper.


5. Add chicken broth and potatoes and cook until potatoes are tender, 23 to 25 minutes.


6. Stir in kale and let cook until leaves are tender and bright green, 3 minutes, then stir in heavy cream, sausage, and bacon and simmer 5 minutes more.


7. Season with pepper, garnish with Parmesan, and serve.


Notes:

* I buy the Italian sausage with the casing already removed. It saves time, and I find the casing disgusting anyway. Also, the hot Italian sausage adds the right amount of heat that is needed to make this soup very tasty. I have tried mild Italian sausage, and the soup was just bland. If you think the hot Italian sausage will be too much heat for you, I suggest using half hot and half mild Italian sausage.


** Make sure that you use low-sodium chicken broth. If you use unsalted chicken broth, the soup will be somewhat bland, and if you use regular chicken broth, it will be too salty. Using the low-sodium chick broth allows you to add the amount of salt you desire.


*** I actually use two 15 oz cans sliced potatoes. It is up to you whether you drain the potatoes or not. Sometimes I do, sometimes I don’t. If I don’t drain them, it adds a thicker consistency to the soup. The canned potatoes stay together better than fresh potatoes. If you cook the potatoes fresh, the red will stay together better than the russet, but they too will begin falling apart. If not using the canned potatoes, a waxy potato works best. Canned potatoes do not need to cook for 23-25 minutes because they are already cooked and just need to be warmed up, but I cook them for 25 minutes anyway to allow for the chicken broth to reduce a little.


**** Because this recipe calls for low-sodium chicken broth, the parmesan adds the perfect amount of additional saltiness to the soup. It also adds a wonderful additional layer of flavor to the soup.


Additional Note: 

If you want to make a large batch and freeze the soup, the canned potatoes do not become as mealy as the fresh potatoes when they are frozen. If you decide to make a large batch and freeze this soup, take out the amount of soup you’d like to freeze before adding the cream. If you add the cream and then try to freeze it, it will not freeze correctly. As a coworker of mine recently said, cream does strange things in the freezer.

Friday, November 24, 2023

Leftovers

Like many others in the United States, I had leftovers from my Thanksgiving dinner yesterday. I ate all the cornbread dressing, but I did not eat all of the turkey. Most people seem to slice the turkey and make turkey sandwiches. I’m not one of them. When I have leftover turkey like I did yesterday, I prefer to make a soup. I love soups, and for me, it’s the best part of winter. I have my usual go to soups: Zuppa Toscano, chili, vegetable soup, Brunswick stew, beef stew, and tomato soup. However, my favorite recipe to make from leftover turkey is actually a Halloween recipe (I used to make this for a Halloween party each year) called Ghostly White Chili. It’s actually not a chili, it’s more of a spicy chicken and wild rice soup, but I’ve never tried to give it another name. So here’s the recipe:


Ghostly White Chili


Ingredients

  • ½ tablespoon olive oil
  • ½ tablespoon butter
  • ½ medium onion, chopped
  • 1 minced cloves garlic
  • 1 ½ cups cubed cooked turkey
  • 1 cups cooked wild rice
  • ½ can Great Northern white beans
  • ½ can white corn
  • 1 cans diced chilis
  • 3 cups chicken (or turkey) broth
  • ½ teaspoon cumin powder
  • dash of tabasco sauce to taste
  • 3 ounces shredded Monterey Jack cheese

Preparation Steps

  1. SautΓ© the onion and garlic in the butter and olive oil until soft.
  2. Add the remaining ingredients except for the cheese and cook for 1 hour.
  3. Place in individual bowls and garnish with cheese.


Note: I love white chili and the addition of wild rice makes this dish really special. For the Halloween part, make sure to tell your guests that it used to be normal chili, but it got so scared, it turned white. I prefer turkey in white chili, but cooked chicken can be used. You can also cook this in a slow cooker: 8 hours on low; 4 hours on high. In my opinion it is best if the wild rice fully opens and curls up.

Thursday, November 23, 2023

Happy Thanksgiving! πŸ¦ƒ

In the United States, Thanksgiving means different things to different people. For some, it’s about the food. For others, it’s about family and friends. The one thing it should be about is what we are thankful for. I am thankful for many things. I am thankful that Susan is in my life and is such an important person and a wonderful friend. I am thankful for my little furry companion, Isabella. I am thankful for all of my friends and blog readers. We may wish for some things to be different in our lives, but hopefully, we all also have much to be thankful for. On this Thanksgiving, wherever you are in this world, know that I am thankful for you.


This Thanksgiving, I will be cooking just for me. I have a small turkey breast to bake along with some Brussels sprouts. I am also going to make a pan of cornbread dressing. It is one of my favorite holiday dishes, and I thought I’d share the recipe with you. This recipe makes a big batch. I will use less than half of this for mine today since it will just be me.


First, you have to start with making the cornbread. This is a recipe for the cornbread I usually make, but I add in the spices that I need for the dressing: celery salt, onion powder, Cajun seasoning, freshly cracked black pepper, sage (or Bell's seasoning), and poultry seasoning (to make regular cornbread, omit those spices and just add in one teaspoon of salt). If you’d prefer to have celery and onions in your dressing, chop one to two stalks of celery and a small onion. I prefer for mine to have the taste of the vegetables, but I don’t like either of the vegetables cooked in my dressing. So, here’s the recipe for the cornbread:


Cornbread for Dressing


Prep Time: 7 min

Cook Time: 25-30 min


Ingredients

  • 2 cups self-rising cornmeal mix (if you use plain cornmeal, add 2 tablespoons baking powder and one tsp salt)
  • 1/2 cup self-rising flour (if you use plain flour, add 3/4 teaspoon baking powder and 1/8 teaspoon salt)
  • 3 tablespoons butter
  • 1 3/4 cups buttermilk or regular milk (Start with 1 cup of liquid if you are using regular milk and add the rest as necessary)
  • 1 teaspoon celery salt, or to taste
  • 1 1/2 tsp onion powder
  • 1/2 teaspoon of Cajun seasoning (like Slap Ya Mama), or to taste, optional
  • 1/4 teaspoon of freshly cracked black pepper, or to taste
  • 1/2 teaspoon of sage (or Bell's seasoning), or to taste, optional
  • 1 teaspoon of poultry seasoning

Preparation Steps

  1. Preheat the oven to 400 degrees.
  2. Melt butter as the oven preheats in an 8" x 8" pan.
  3. Add cornmeal, self-rising flour, and seasonings in a bowl and mix with a fork. Make a well in the center of the mixture for the butter and buttermilk.
  4. Add the melted butter and buttermilk to the well.
  5. Mix until combined.
  6.  Grease the pan well so it does not stick. I spray the pan liberally with additional butter-flavored PAM. Pour batter into the baking pan.
  7. Bake for 25-30 minutes or until golden and set.


Note: You can also mix in two beaten eggs to this recipe, but I have never liked eggs in my cornbread. Also, never, ever, add sugar, honey, or any other sweetener to this cornbread. If you like sweet cornbread, it's fine on its own, but you need a more savory cornbread for dressing.


Once the cornbread is done, let it cool enough to be able to handle it. I sometimes take leftover cornbread that I have frozen, thaw it out, and add the additional spices.


Cornbread Dressing


Servings: About 10 to 12 servings

Prep Time: 5 min

Cook Time: 45 min


Ingredients

  • 6 cups of cooked, crumbled stale cornbread, as directed above (fresh is also fine)
  • 1 cup of turkey gravy (canned is fine)
  • 4 to 6 cups of turkey or chicken broth or stock, more or less

Preparation Steps

  1. Preheat oven to 350 degrees F. Butter a 9 x 13-inch pan and set aside.
  2. Add the crumbled cornbread to a large bowl. Add the gravy and 2-4 cups of the stock. Taste and adjust seasonings.
  3. Add more of the broth as needed, taking care not to make the dressing too soupy. The dressing should be the consistency of cooked oatmeal. Lightly spoon into the casserole dish, but do not pack down. Bake at 350 degrees F for 45 minutes. For moister stuffing, bake covered. For a drier stuffing with a crunchy top, bake uncovered.
Cook's Notes: Make cornbread a day or two ahead when possible and allow it to go stale. This dressing is also excellent with cooked turkey or chicken. Mix in about 2 cups of roughly shredded, cooked chicken or turkey before baking. Serve with gravy on top. My Grandmama used to add shredded chicken or turkey to hers, and it was especially delicious and could become a main dish instead of a side dish.

Make-Ahead Tip: While dressing is best when freshly assembled and baked, you may prep most of the ingredients ahead to save time. To prepare the entire dish ahead, assemble it all the way up to the baking stage the day before, using additional broth to make it more soupy, but don't bake it. Cover tightly and refrigerate. Any longer ahead than that freeze it. You'll need to allow for a day for it to thaw in the fridge before baking.

How to fix a too-dry or too-wet stuffing:
If you find your stuffing is too dry, add additional warmed broth to it, stir well, and return to the oven, checking periodically. If the stuffing is overly wet and too gummy, cook it uncovered for a bit longer, checking periodically.

PS My leftover turkey is going to become a recipe for a special turkey “chili” that I love. Maybe I’ll post that recipe tomorrow, if anyone is interested. It’s more of a soup than a chili, but it is delicious. It calls for wild rice, which is impossible to find in New England. I had to order it special, and hopefully 🀞 it will come tomorrow.

Monday, August 8, 2022

Damn Delicious Scones

Friday, I was not feeling very well and ended up going to bed at 8 pm. I usually go to bed between 10 pm and 10:30 pm, but I was feeling completely worn out and went to bed early. I was also a little depressed, but I don’t know why. I was just feeling down. I slept for about an hour and a half before I was wide awake again and could not fall back to sleep. 


Earlier in the day, I had planned to mix up some ham and cheese scones. I usually make them up the night before and put them in the refrigerator, so they are ready to take out and put in the oven the next morning. However, with the way I was feeling, I had not done this, but when I woke up after sleeping for an hour or so, I decided to mix up a batch of scones. I mostly use my food processor to mix everything up but the buttermilk, so it’s a pretty easy process, and cooking always puts me in a better mood if I can get myself motivated enough to start.


I put the dough in the refrigerator and went back to bed. Once I got up Saturday morning, all I needed to do was preheat the oven and knead and roll out the scones. It makes it a lot easier in the morning to do it this way. I am putting my recipe below. This is an adapted recipe from the site Damn Delicious, and let me just say, “These scones are damn delicious.” Once they come out of the oven, they are hard to stop eating. If you can resist eating them all, just put the leftovers in a container or Ziploc bag and save them for later. If you do save them for later, you will realize they aren’t quite as fluffy, so what I do is toast them before I eat them. It brings them back to nearly the way they were when they first came out of the oven.


I hope you enjoy this recipe. Whenever I make these, it makes my whole day better.


Ham and Cheese Scones


Yield: 8 Servings

Prep time: 15 Minutes 

Cook time: 20 Minutes 

Total time: 35 Minutes


Ingredients:


·      2 cups self-rising  flour1

·      1/2 teaspoon garlic powder

·      1/2 cup salted butter, cut into cubes

·      3/4 cup buttermilk

·      1 cup shredded cheddar cheese2

·      1/3 cup diced ham3

·      2 tablespoons chopped fresh chives


Optional:

·      1 egg

·      1 tablespoon milk

·      1/4 cup finely shredded cheddar cheese


Directions:


1.     Preheat the oven to 425 degrees F. Line a baking sheet with parchment paper or a silicone baking mat or spray a cone pan with non-stick cooking spray; set aside.

2.     In a food processor, combine flour and garlic powder. (For slightly sweeter scones, you can also add 1 tablespoon of sugar.)

3.     Add cold butter, and pulse the food processor until the butter and the dry ingredients resemble coarse crumbs. 

4.     Add cheese, ham, and chives, and pulse to combine.

5.     Pour the mixture into a large bowl and stir in buttermilk until a soft dough forms.

6.     Working on a lightly floured surface, knead the dough 3-4 times until it comes together. Using a rolling pill, roll the dough into an 8″ circle, about 1-inch thick, and cut into 8 wedges.

7.     Place scones onto the prepared baking sheet or into the scone pan. 

8.     (Optional) Beat egg and milk in a small bowl and brush onto the top of the scones. You may also top the scones with additional cheese.

9.     Place into oven and bake for 18-20 minutes, or until firm to the touch and lightly browned.

10.  Serve warm.


Notes:

1.             If you don’t want to use self-rising flour, you can use 2 cups of all-purpose flour, 1 tablespoon baking powder, and 1/2 teaspoon kosher salt. If you use these ingredients, use unsalted butter.

2.             I like to use Cabot Seriously Sharp Cheddar

3.             I use Smithfield Hickory Smoked Diced Ham